How the Aeneis 7.0 Layouter works
If you perform appropriate actions when modeling your BPMN diagram, the Auto-Layouter works as described in the following sections.
Create diagram
When creating a diagram, a named start event is automatically created and positioned in the drawing area:

Nodes positioning
Nodes (shapes) are automatically positioned and arranged in the drawing area by columns and rows. Each node is assigned a cell that has a variable size. The size of the cell changes depending on the position, height and width of the shape and its additional elements, such as labels, inputs and outputs. The width of individual columns and the height of individual rows always adjust to the largest cells in each case. Additionally, all shapes are arranged in the same row or column along a horizontal and vertical center axis:

The overall layout adjusts proportionally after you insert, move, or delete nodes. The nodes and connectors of the diagram are then moved row and column by column: The Auto-Layouter takes into account the relationship of the nodes to each other:

| No. | Description |
|---|---|

|
The arrangement and positioning of a new shape depends on the selected area in the drawing area, where it is placed by dragging and dropping. For example, if a new shape is not dragged onto the marker of another shape or a connector, the Auto-Layouter will not draw a connector. The new element is placed in the same column (for horizontal layout) as the start event. The new shape is positioned and arranged in the selected permissible area (e.g. a swim lane) in a free row in this column. The automatic positioning of the shape within the cell cannot be changed manually in the drawing area. |
|
|
When shapes are dragged and dropped onto a selected shape, the Auto-Layouter draws connectors between the shapes. The new shape is initially placed in the same swimlane in the same row. This automatic assignment of responsibility can be changed by manually moving the shapes in question to the desired swimlane. The shapes are then automatically positioned and arranged in the desired swimlane again. |
|
|
When a shape that is already connected is moved to another swimlane, it is positioned and arranged in the next free cell of the swimlane. |
|
|
If multiple shapes are placed on the same selection area of a selected shape, they will be arranged in parallel. All shapes placed on a shape are positioned and arranged in the same column in different rows (for horizontal layout). |
See also: Chapter Shapes.
Diagram alignment
Depending on the diagram layout, BPMN elements are arranged differently. In the settings you can choose between vertical and horizontal layout:
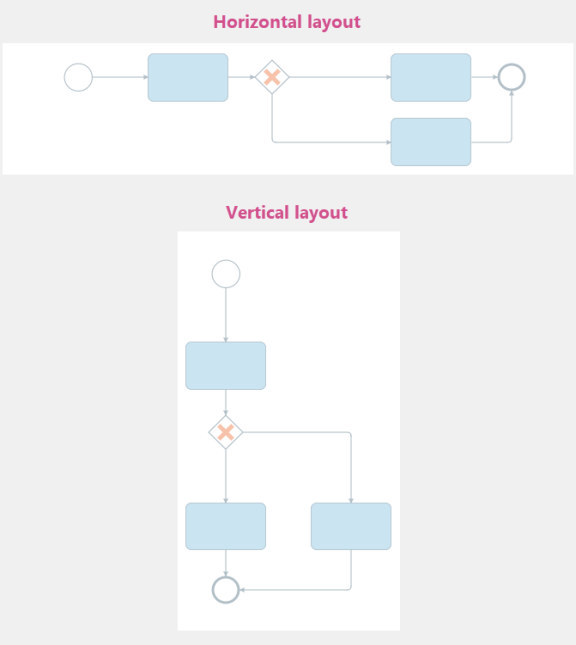
See also: Chapter Display swimlanes vertically and horizontally.
Arrangement of shapes and connectors
Depending on the lane style that is set, the Auto-Layouter arranges shapes and connectors differently:
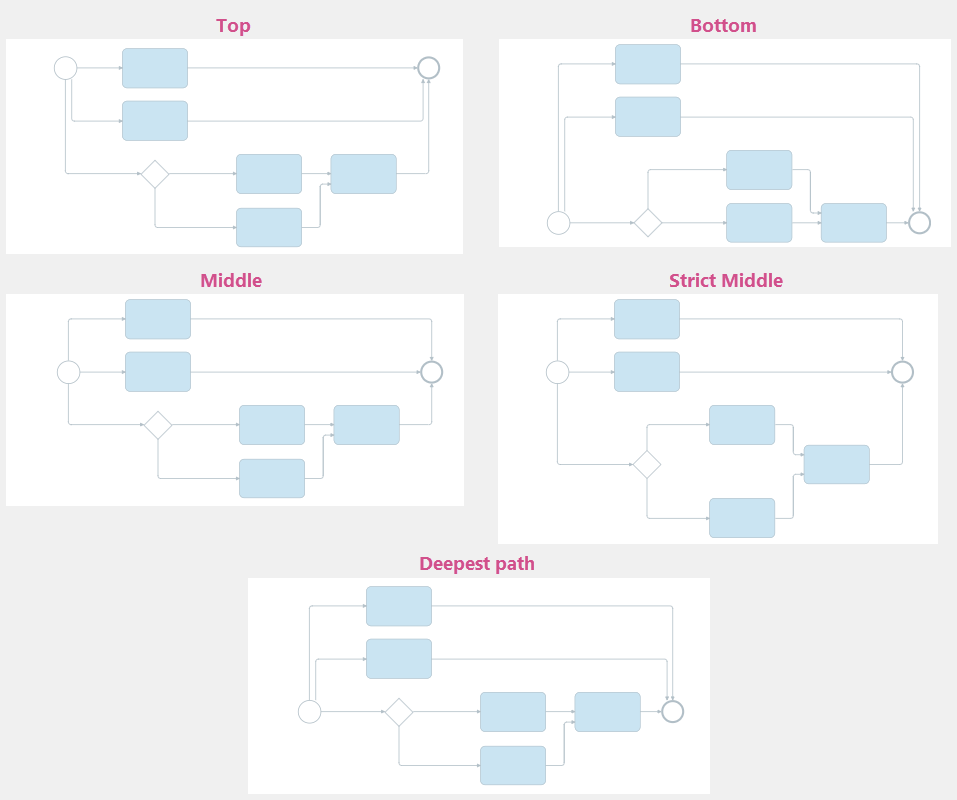
See also: Chapter Customize BPMN diagram layout.
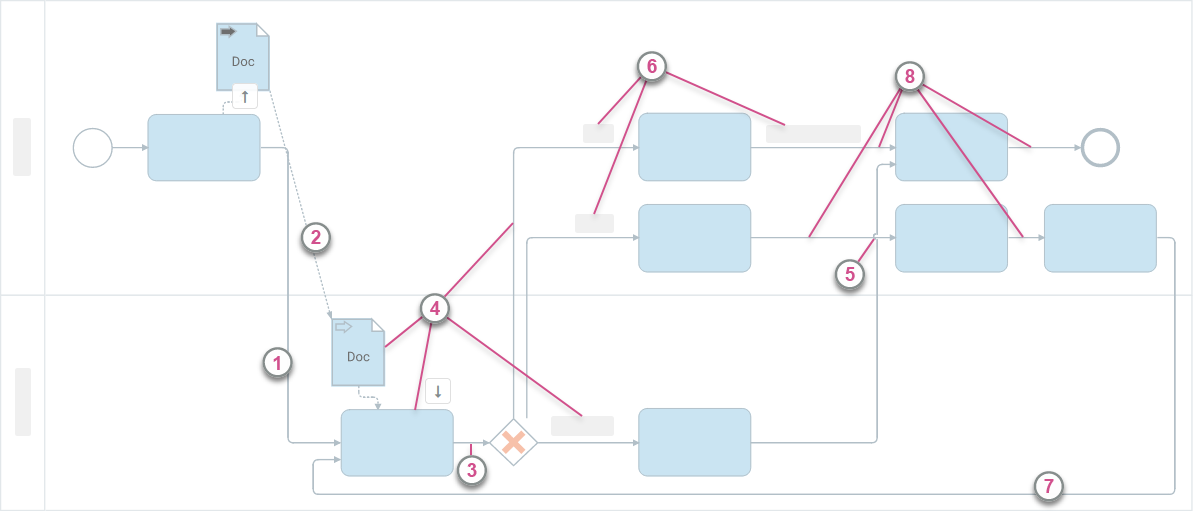
The lengths of the lines and the courses of the connectors between the shapes are drawn automatically. The connectors between shapes in the sequence flow run along a horizontal and vertical axis. When you insert or delete connectors, the overall layout adjusts proportionally. The nodes and connectors of the diagram then move row by row and column by column. The Auto-Layouter considers the relation of the nodes to each other:
| No. | Description |
|---|---|

|
When the responsibility for the following activity in the sequence flow changes, the connector to the next shape is drawn automatically. |
|
|
To represent special relationships between elements in the diagram outside the sequence flow, the Auto-Layouter resorts to alternative connector progressions and layouts. See for example the chapters Collaborative processes and Model input/output flows. |
|
|
Connectors are drawn with a minimum length. |
|
|
The length of the connector is influenced by the size of the individual shape cells that the connector must pass through to the next shape. |
|
|
Intersections with other connectors are drawn automatically. |
|
|
Path names affect the length of the connector. The overall layout adjusts proportionally after path labels are inserted or deleted. The nodes and connectors of the diagram then move row and column by the space occupied by the path labels. |
|
|
The Auto-Layouter automatically draws jumps back to the desired shape. The connector course is drawn automatically with its direction changes. |
|
|
For nodes arranged in parallel, connectors of different lengths are drawn depending on the size of each shape or path labels. In this case, the paths adapt to the length of the longest connector so that the nodes are arranged along the same vertical center axis. |
See also: Chapter Connectors.
Connectors go out and in from the center of the shapes. Depending on the setting, a shape may have only one or more inputs and outputs per side for connectors. The lane style influences on which side of the shape the connectors enter and leave:
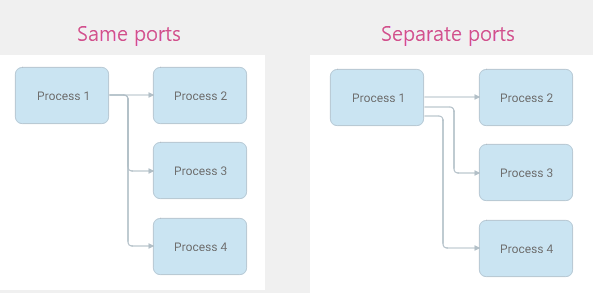
See also: Chapter Define different connector inputs and outputs for each drawing.
Label positioning
Labels of BPMN elements are automatically positioned and arranged:

| No. | Description |
|---|---|

|
The swimlane label is automatically centered in the swimlane header. If more characters are used in the designation than is allowed due to the swimlane height, hyphenation is automatically performed. You can change the height of the swimlane (for horizontal layout) only manually or depending on the occupied cells that are in the swimlane. |
|
|
The name of activities is placed in the shape. The height and width of the text box depend on the height and width of the shape. If you do not increase the height and width of the shape manually, the font size is automatically reduced above a certain amount of characters. If you increase the height and width of the shape, you can use more characters in the set font size. When you change the height and width of a shape, the horizontal and vertical center axis of the shapes in the same row and column automatically shift. |
|
|
The label of events and branches is placed outside the shape. The size of the text field adjusts automatically depending on the amount of characters. The text field belongs to the area that the shape occupies in the diagram and affects its cell size. You can freely move, enlarge and reduce the text field within the shape's swimlane. The space that the label occupies within the cell affects the overall layout of the chart. |
|
|
Path labels are placed on the connector or above it as start or end text, depending on the setting. The size of the path labels affects the length of the connector. When you insert or delete path labels, the overall layout adjusts proportionally. The nodes and connectors of the diagram then move row and column by the space occupied by the path labels. |
Pools and swimlanes
Pools in diagrams are drawn automatically. The height and width of pools adjust according to the cell size of each node. The height of the swimlanes (for horizontal layout) adjusts according to the cell size of each node.

See also: Chapter Pools and swimlanes.
Artifact positioning
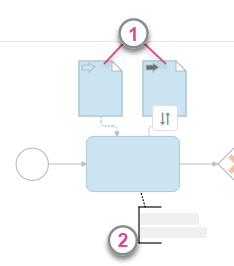
Artifacts are automatically positioned depending on their node:
| No. | Description |
|---|---|

|
Inputs and outputs displayed as documents belong to the area occupied by the node in the diagram and affect its cell size. You can increase and decrease the size in the drawing area. The overall layout adjusts proportionally depending on the size of the node cell. The nodes and connectors of the diagram then shift row and column by the space occupied by the entire range of the node cell. See also chapter Inputs/Outputs. |
|
|
BPMN comments are always drawn relative to the node only. They do not affect the overall layout of the diagram. See also Insert comments at the shape. |
Extended layout optimization
The layouter Aeneis 7.0 has an extended layout optimization function that is enabled by default. This optimization ensures that the layouter avoids connector overlaps.
Note: Other layouters do not have the extended layout optimization. The use of the Layouter 7.0 is therefore recommended.
Complex diagrams may take longer to load until the layouter renders the optimum connector paths. If the complexity is too high, the extended layout optimization is automatically disabled. As a result, there may be more overlaps between the connectors than before. However, you will achieve a faster rendering of the diagram. If the extended layout optimization is disabled, a note at the bottom right of the WebModeller will draw your attention to this:

If you then change the diagram so that the complexity is reduced again and the loading time falls below a certain duration, the extended layout optimization is reactivated automatically. When the extended layout optimization is enabled again, a note at the bottom right of the WebModeller will draw your attention to this:


